If you’ve ever found yourself scrolling through social media and stopping to stare at colorful, sparkling mosaic art, you’ve probably seen diamond art kits in action. Diamond art, also known as diamond painting, takes tiny, shiny resin “diamonds” and sticks them onto a preprinted canvas to make eye-catching, vivid pictures. It’s easy to see the appeal; the process is relaxing, the supplies are affordable, and the final results are seriously impressive. But before you order your first kit, it makes sense to know what’s actually involved so you can start off strong and avoid a few common pitfalls. Here’s everything I wish I’d known before my first diamond art project.
What Is Diamond Art and How Does It Work?
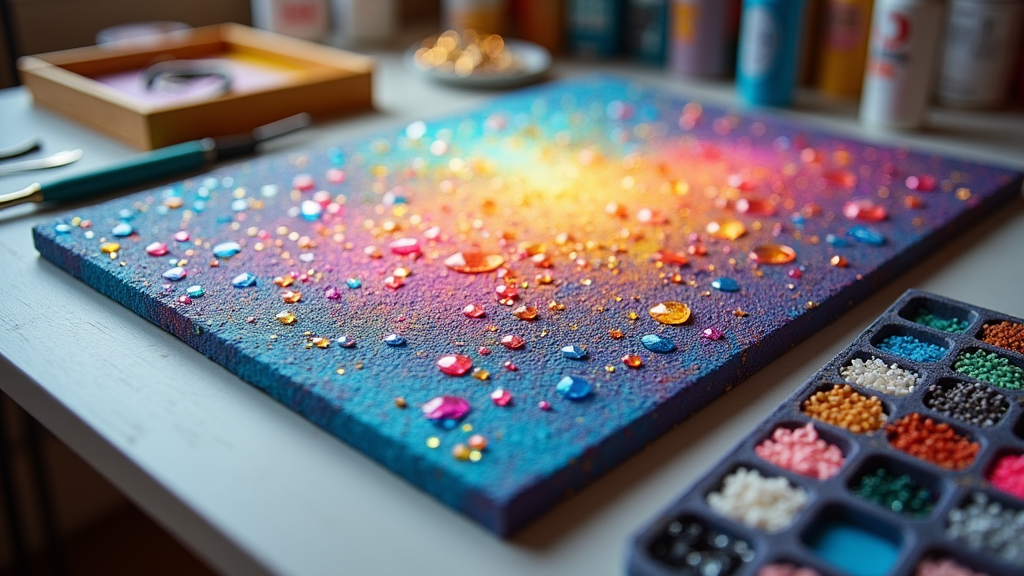
Diamond art is a craft where you place small, faceted resin beads (called “drills” in the diamond art world) onto a sticky, color-coded canvas. Think of it like painting by numbers, but the “paint” comes as tons of sparkly gems. Every color in the picture has a symbol; each symbol tells you which shade of drill goes where. All you do is use the included pen tool to pick up the drills and stick them down, one by one, until the canvas is totally covered and shimmers beautifully in the light.
These kits are surprisingly detailed once you see them up close. You can find designs that feature landscapes, animals, flowers, abstract patterns, or even custom portraits from your favorite photos. It’s a really satisfying activity for anyone who loves working with their hands and enjoys seeing a project take shape piece by piece. In fact, some people say it helps with stress, since the repetitive actions are a bit like meditation.
All the Tools and Supplies in a Diamond Art Kit
Most beginner diamond art kits come with everything you need, so there’s no need to grab a bunch of extra stuff right away. It’s helpful, though, to know what each tool does and what you might want to upgrade later:
- Adhesive Canvas: The canvas has a preprinted design and a sticky surface to hold the drills in place. There’s always a plastic film to peel back as you work, which keeps the sticky area fresh.
- Drills: These are the little resin diamonds. Kits usually come with a bag for each color, and the most common types are “round” or “square.” Round is usually easier for beginners, while square gives a more complete, pixelated look.
- Applicator Pen: Use the pen to pick up a single drill at a time. Pop some wax into the pen tip to make the diamonds stick before you place them on the canvas.
- Tray: Pour some drills into this shallow tray and gently shake so the flat side faces down. It makes grabbing individual drills way easier.
- Wax or Gel: This lets the pen grab onto the top of the drills. Kits always include a little square of wax.
- Tweezers (Sometimes): Some kits throw in a pair of tweezers for fine-tuning or picking up mistakes, but the pen alone does most of the work.
You don’t need fancy tools to get started, but after a few projects, you might want to buy extras, like a light pad (which slides under the canvas to make the symbols easier to see) or a multiplacer tool (this lets you lay down several drills at once and makes things faster).
How to Choose the Right Beginner Diamond Art Kit
The sheer number of diamond art kits online can make it tough to pick out one that actually fits a newbie. My advice? Pick a kit designed for beginners—something small to medium in size (maybe 20×20 cm to 30×40 cm) with a simple design and clear, bold symbols. Here’s what to look for:
- Size of the Canvas: Larger canvases look amazing, but they take more time and patience. Smaller kits get finished faster and help keep your motivation up.
- Round Drills vs. Square Drills: Round drills are easier and go down faster—a great choice for your first try. Square drills fit together tightly and give crisp lines, but can be a little trickier for beginners.
- Quality of Printing: Make sure the symbols are easy to read and the canvas is clearly marked. Fuzzy or tiny symbols make it frustrating more than fun.
- Clear Instructions: Good kits walk you through what to do. If you’re brand new, look for kits that include a guide or a link to video tutorials—sometimes there’s a QR code right on the box.
- Complete Set: Beginners should have all needed supplies in one box: canvas, drills, pen, tray, wax, and (optionally) tweezers.
Checking customer reviews for mentions of missing drills or unclear printed symbols is always a good idea before buying. Look out for sellers who reply promptly if there are any issues, as this can save you a lot of stress later.
Setting Up and Organizing Your Workspace
Diamond art is all about patience and slow, steady progress, so a little setup up front goes a long way. I always clear a flat table, lay out the kit, and peel back just enough plastic cover to reveal a small working area, maybe a two inch square corner. Cover up the rest of the sticky canvas with the protector sheet or use parchment paper pieces to keep the adhesive fresh and stop it from getting dusty.
Organize colored drills using small bowls, trays, or resealable bags. Label them by number or symbol. Believe me, chasing runaway drills off the floor is not much fun, so keeping things organized is really important for stress-free crafting! Some people even use empty pill organizers or tic-tac boxes for storage to avoid spills and make color changes simple.
A good adjustable lamp or a light pad under the canvas helps you see everything clearly. And keep the wax and pen handy; you’ll be dipping and sticking dozens (maybe hundreds) of times per session. If you want to craft for longer periods, consider an ergonomic chair or cushion for comfort—it’s easy to lose track of time when you’re in the crafting zone.
Beginner Friendly Tips to Make Diamond Art Enjoyable
Getting started with diamond art comes down to these practical tips from my first experiences (and mistakes):
- Go Slow and Enjoy the Process: This isn’t a race. Focusing on one area at a time means fewer mistakes and gives you a more relaxing vibe.
- Check Drill Inventory First: Count your drills before starting. Most kits include extras, but if any bags are missing or short, reach out to the seller right away.
- Work in Sections: Peel away the protective plastic in small areas as you go so the adhesive stays sticky and clean. If you’re working on a larger kit, consider outlining a section with a ruler or washi tape—this helps keep you on track.
- Use the Pen’s Wax Often: Dab the pen in the wax whenever you notice it stop picking up drills easily. Running low on wax? Some people use reusable tack or certain craft glues as a backup. And if wax leaves residue, a quick wipe with a damp cloth can help.
- Tweak Drill Placement: If a drill lands a little off-center, a gentle nudge with the pen tip or tweezers can line it up perfectly. Light pressure helps the drills sit flat and gives the finished piece that neat sparkle.
- Check Your Work in Good Light: Under bright light, it’s easier to spot colors out of place or gaps where a drill might be missing. This quick check saves time fixing mistakes later.
Diamond art is supposed to be satisfying and a little soothing. If you hit a rough patch, like spilling some drills or losing track of where you left off, it helps to step away and return later with fresh eyes. Turn on some music or your favorite show in the background to make the time fly by.
Common Challenges and How to Handle Them
- Sticky Residue: Accidentally touch the canvas with your hands and you might notice the surface losing tackiness. Using clean, dry hands and replacing the plastic sheet whenever you pause will protect the adhesive. If you do lose stickiness in a spot, a quick dab of craft glue can restore the hold.
- Missing Drills: Sometimes a bag runs short. Most reputable kit sellers will send replacements if you ask for a specific color or code. You can also swap out a nearly-similar shade from previous kits if you’re in a pinch for a small area.
- Eye Strain: Staring at the tiny details for ages can be tough. Take breaks, stretch, and use good lighting or a magnifying lamp when needed to avoid headaches or soreness. Remember, the journey is part of the fun!
- Static Cling: Especially in dry environments, the drills can stick together. Rubbing a dryer sheet over the bags or tray helps stop this from being too annoying. If static really gets bad, lightly dampening your hands can help pick up stray drills.
- Boredom: Some larger pieces can seem overwhelming. Switch up the order of colors or sections, or invite a friend to craft with you to keep the experience fresh.
It’s rare for diamond art to go perfectly smooth from start to finish. Most issues are easy to fix (or work around), and they won’t affect the impressive sparkle when your project is finished.
When Your Art Is Done: Finishing and Displaying Tips
Framing and finishing diamond art can be super satisfying. Once you’ve placed the last drill, lay a clean towel over the piece, then use a rolling pin or flat, heavy book to gently press down across the whole canvas. This sets the drills and makes everything lay flat and snug. Dust off any loose bits and inspect for missed spots. Filling them in now keeps your finished piece looking perfect.
For displaying, a simple frame (with or without the glass, depending on personal style) works well. Some people use doublesided tape or foam board backing to hold the canvas tight inside the frame. There are also adhesive sprays for extra security, but most of the time, the canvas’ stickiness holds up just fine. Wall space or a shelf is all you need to show off your shiny masterpiece! If your finished project is smaller, a magnetic frame or canvas hanger is a quick way to swap designs out as you make new ones.
Frequently Asked Questions
Do I need a special space to do diamond art?
You don’t need a dedicated craft room. Just a clean, flat table and decent lighting is plenty. I often work right at my kitchen table or a small desk. If you like to keep things portable, choose a project with a smaller canvas size.
How long does a typical beginner kit take?
Most small kits can be finished in a few evenings. Larger or more detailed projects can take several weeks. The pace depends on your focus and how often you work on it. Give yourself permission to pause and come back when your motivation returns.
Can I run out of drills?
Most kits include at least 10% more drills than you actually need, so you shouldn’t run out. If you do, sellers online are usually helpful about sending more, especially through crafting communities or marketplaces like Etsy.
Are diamond art kits suitable for kids?
Yes, as long as they’re past the stage of putting small objects in their mouths. Some kits are specifically designed for kids and use bigger drills, making the project faster and easier. The process is great for growing patience and fine motor skills in children and for joint projects with family members.
Final Thoughts
Jumping into your first diamond art kit is a fun way to get creative, enjoy some screen-free time, and end up with a unique sparkling piece for your wall. With just a basic understanding and a few handy tips, anyone can start and finish their first project. Whether you’re after a calming new hobby or hoping for a beautiful result, there’s a diamond art kit out there that fits the bill. Enjoy the ride—the glitter and shine is totally worth it!